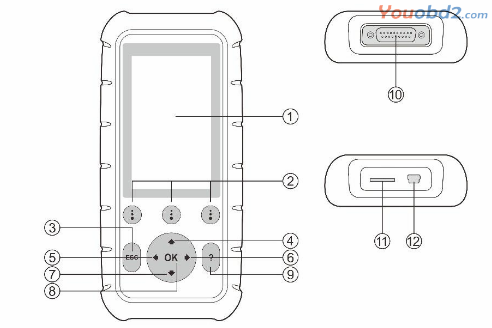
1.LCD DISPLAY – Indicates test results. TFT color display (800 x 480 dpi).
2.FUNCTION BUTTON – Corresponds with 11 buttons” on screen for executing commands.
3.ESC BUTTON — Cancels a selection (or an action) from a menu or returns to the previous screen.
4.UP SCROLL BUTTON – Moves up through menu and submenu items in menu mode. When more than one screen of data is retrieved, moves up through the current screen to the previous screens for additional data. When looking up DTC, it is used to change value of selected character.
5.LEFT SCROLL BUTTON – When look up DTC definitions of Autel MaxiDiag MD808,moves to previous character and views additional information on previous screens if DTC definition covers more than one screen; views previous
screen or previous frames of recorded data. It is also used to view previous trouble code when viewing DTCs.
6.RIGHT SCROLL BUTTON – When look up DTC definitions, moves to next character and view additional information on next screens if DTC definition covers more than one screen; views next screen or next frames of recorded data.. It is also used to view next trouble code when viewing DTCs.
7.DOWN SCROLL BUTTON – Moves down through menu and submenu items in menu mode. When more than one screen of data is retrieved, moves down through the current screen to next screens for additional data. When looking up DTC, it is used to change value of selected character.
8.OK BUTTON – Confirms a selection (or an action) from a menu.
9.HELP BUTTON – Provides help information for the function conducted on the screen.
10.CONNECTOR – Connects the scan tool to the vehicle’s Data Link Connector (DLC) via Main Cable.
11.Micro SD CARD SLOT – Holds the System Micro SD card.
12.USB CONNECTOR – Connects the scan tool for power supply.
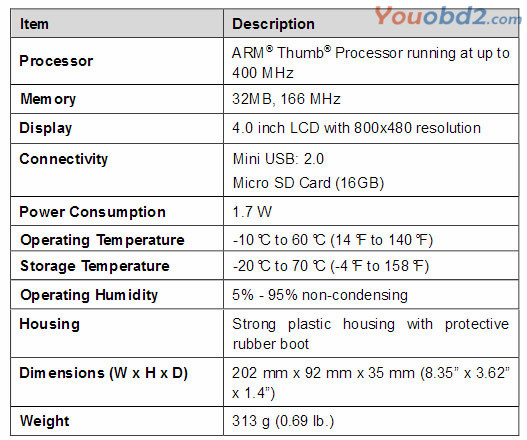
Technical Specifications
Accessories Included
1)User Manual – Instructions on tool operations.
2)Main Cable – Provides power to tool and communicates between the Professional diagnostic technician and the vehicle.
3)USB Cable – Used to update the scan tool, and to print retrieved data.
4)Micro SD Card – Contains the scan tool’s operation software and applications.
5)Quick Guide – Instructions on basic operations, tool registration and software update, etc.
6)Carry Case – A plastic case to store the scan tool when not in use.
Keyboard
No solvents such as alcohol are allowed to clean the keypad or display. Use a mild nonabrasive detergent and a soft cotton cloth. Do not soak the keypad as the keypad is not waterproof.
Power
Before using the scan tool, you must provide power to the Auto Scan Tool. There are two methods for providing power to the scan tool.
USB external power adapter.
Main Cable connection to vehicle.
During vehicle testing, power for the scan tool is usually provided through the vehicle Main cable connection. When the scan tool is not connected to a vehicle, the scan tool can be powered with a USB external power adapter.
To power on the scan tool via Main Cable connection with the vehicle:
1)Connect the Main Cable to scan tool.
2)Find DLC on the vehicle.
A plastic DLC cover may be found for some vehicles and you need to remove it before plugging the Main Cable.
3)Plug the Main Cable to the vehicle DLC.
4)Wait for the Main Screen to appear.
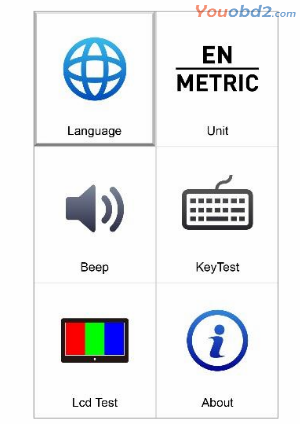
System Setup
The System Setup functions allow you to adjust default settings and view information about the scan tool.
1)Language: Selects the desired language.
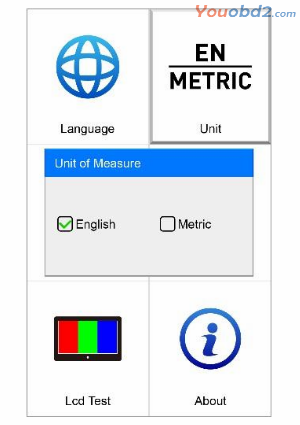
2)Unit of Measure: Sets the unit of measure to English orMetric.
3)Beep Set: Turns on/off the beep.
4)LCD Test: Checks if the LCD display is working properly.
5)Key Test: Checks if the keyboard is working properly.
6)About: Provides information of the scan tool.
Settings of the unit will remain until change to the existing settings is made.
To enter the Setup menu
From the Main Screen, use LEFT/RIGHT scroll button to select Setup, and press the OK button. Following the instructions to do adjustments and settings could make your diagnosis more conveniently and easily.
Language
English is the default language.
1)From System Setup screen, use the UP/DOWN scroll button and LEFT/RIGHT scroll button to select Language, and press OK.
2)Use the UP/DOWN scroll button to select the desired language and press OK to save your selection and return to previous screen.
Unit of Measure
Metric is the default measurement unit
1)From System Setup screen, use the LEFT/RIGHT scroll button to select EN/METRIC unit and press OK.
2)From Unit of Measure screen, use the LEFT/RIGHT scroll button to select the desired unit of measurement.

3) Press OK to save your selection and return to previous menu. Or, press ESC to exit without saving.
Beep Set
The default setting is Beep On.
1)From System Setup screen, use the UP/DOWN scroll button and LEFT/RIGHT scroll button to select Beep and press OK.
2)From Beep Set menu, use the LEFT/RIGHT scroll button to select ON or OFF to turn on/off the beep.
The Key Test function checks if the keyboard is working properly.
1)From System Setup screen, use the UP/DOWN scroll button and LEFT/RIGHT scroll button to select Key Test, and press OK.
2)Press any key to start test. When you press a key, the edge around corresponding key on the screen should turn blue. Otherwise, the key is not functioning properly.
3)Double press ESC to return to previous menu.
LCD Test
The LCD Test function checks if the LCD display is working normally.
1)From System Setup screen, use the UP/DOWN scroll button and LEFT/RIGHT scroll button to select LCD Test, and press OK.
2)Look for missing spots in the red, green, blue, black and white LCD display.
3)When completed, press ESC to exit.
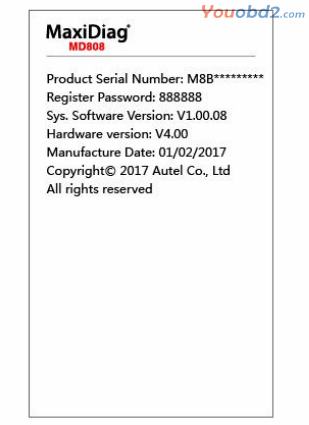
About
The About function allows viewing of some important information such as serial number and software version number of the scanner.
1)From System Setup screen, use the UP/DOWN scroll button and LEFT/RIGHT scroll button to select About and press OK; wait for the About screen to appear.
2)View tool information on screen. Press ESC to exit.

Leave a Reply