1. Powering Up
Press the Lock/Power button on the top right side of the display tablet to switch the unit on. The system boots up, and shows the lock screen. Press and drag the inner ring to the edge of the circle to unlock the screen; the Autel MaxiSYS MS906 Job Menu is shown.
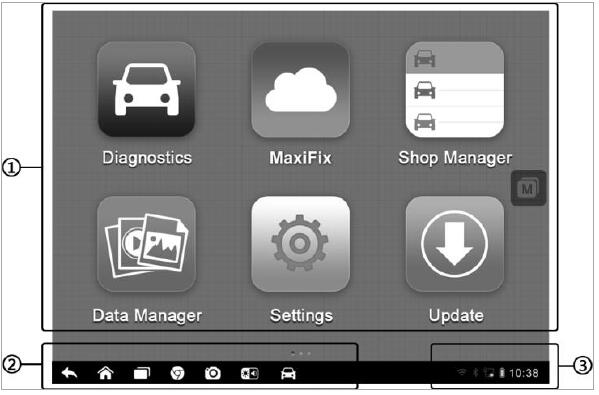
1. Application Buttons
2. Locator and Navigation Buttons
3. Status Icons
NOTE: The screen is locked by default when you first turn on the display tablet. It is recommended to lock the screen to protect information in the system and reduce battery usage.
Almost all operations on the display tablet are controlled through the touch screen. The touch screen navigation is menu driven, which allows you to quickly locate the test procedure, or data that you need, through a s eries of choices and questions. Detailed descriptions of the menu structures are found in the chapters for the various applications.
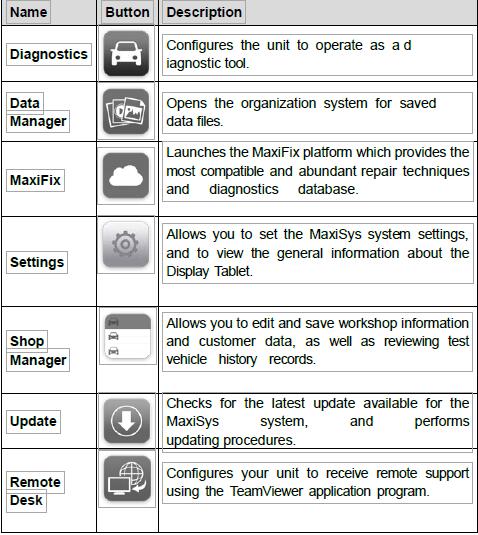
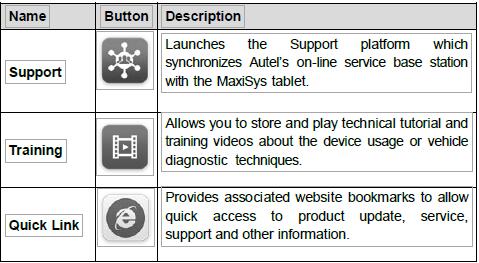
1.1 Application Buttons
The Application buttons configure the Maxisys for the type of operation or activity to be performed. The table below gives brief descriptions of the available applications.
Use your finger tip to select an application from the Job Menu.
1.2 Locator and Navigation Buttons
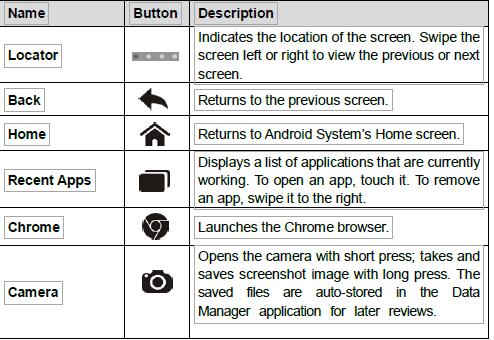
To use the camera:
1. Tap the Camera button. The camera screen opens.
2. Focus the image to be captured in the view finder.
3. Tap the inner blue circle. The view finder now shows the captured picture and auto-saves the taken photo.
4. Tap the thumbnail image on the top right corner of the screen to view the stored image.
5. Tap the Back or Home button to exit the camera application.
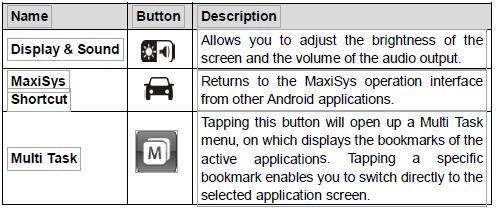
1.3 System Status Icons
These are the standard status icons of the Android operating system. Your display tablet is a fully functional Android Pad. Refer to Android documentation for additional information.
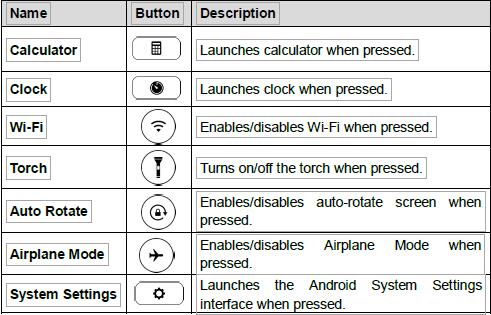
By tapping on this area (bottom right corner), a S hortcuts Panel will be displayed, on which you are allowed to set various system settings of the tablet. Operations of each button on the panel are described in the table below:
2. Powering Down
All vehicle communications must be terminated before shutting down the display tablet. A warning message displays if you attempt to shut down while the display tablet is communicating with the vehicle. Forcing a shut down while communicating may lead to ECM problems on some vehicles. Exit the Diagnostics application before powering down.
To power down the display tablet:
1. Press and hold the Lock/Power Button.
2. Tap Power off option.
3. Tap OK; the tablet will turn off in a few seconds.
2.1 Reboot System
In case of system crash, press and hold the Lock/Power button for 8 seconds to reboot the system.
3 Installing Computer Software
The MaxiSys Diagnostic Platform allows you to realize some of its functions on a c omputer to enhance capabilities and i mprove user experience. To realize these functions on a computer, you need to install certain software.
There are two Setup.exe program packages contained in the CD provided with the MaxiSys tool kit. The packages include the following applications:
To install the Setup.exe program
1. Insert the CD into the CD-ROM of the computer. The driver installation wizard will load momentarily.
2. Click on Next on the welcome page.
3. Click the Change button, and select a destination folder to install the program, and click Next to continue. Or directly click Next to continue without changing the default installation folder.
4. Click Install and the Setup.exe program will be installed onto the computer.
3.1 Printing Operation
This section describes how to receive file from the display tablet and perform printing through the computer:
To perform printing through the computer
1. Install the PC Link (Printing Services program) to the computer.
2. Make sure the obd2tool.com MS906 tablet is connected to the computer network, either via Wi-Fi or LAN, before printing.
3. Run the Printing Services program on the computer.
4. Tap the Print button on the toolbar displayed in various applications of the MaxiSys system. A temporary file will be created and sent to
5. Click the Printer Server tab on the top of the program interface on the computer, and wait for the printing file to load.
6. Click the Print button to start printing.
Leave a Reply